DIY Cute Grass-Heads Using Recycled Materials From Around Your Home :-)
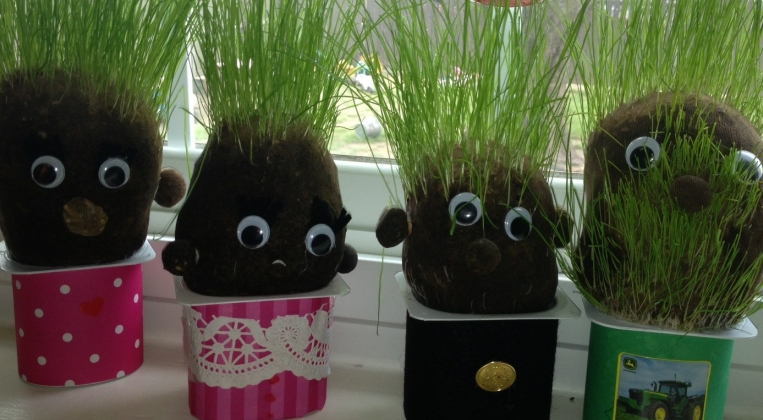
Grass Heads are super easy (and fun) to make, and make great homemade gifts for kids. Kids especially love trimming the “hair”.
In my experience, most grown-ups will love them too! I’ve never yet seen someone who hasn’t laughed or at least smiled a the site of one of these cute heads 🙂
Because they’re such an easy craft idea, your kids might also like to take part in the making. They’ll have good fun decorating the face, and designing clothes and spectacles.
Before you scroll down to my instructions, check out this sweet video I found of a little girl making and trimming a grass head. Mental note: don’t let this kid near my hair with a pair of scissors 😛
Grass Head Materials
You will need:
- Old nylon stockings or pantyhose. Knee highs and pop socks, work great. You can also use regular old socks, but the grass sometimes has trouble poking through.
- Grass seeds . I bought a small “lawn repair kit” which has seeds pre-mixed with slow release fertiliser, but you can use whatever seeds you’ve got handy. I hear that chives, rye or alfalfa seeds also work well.
- Sawdust or potting mix for stuffing. Or just some soil from your garden. I got a bag of sawdust for free from a big hardware store – they seemed happy to get rid of it!
- Small yoghurt pot .
- Decorations . Goggly eyes and fabric scraps for the heads, coloured paper for the bodies, pipe-cleaners for spectacles… get creative 🙂
- Water-proof glue . For sticking on the eyes, lips, etc. I used hot glue, but you can use any sort of glue so long as it won’t dissolve in water.
Instructions
 Step 1: Cut off an 8″ (20cm) section of stocking that includes the toe. (You could also use a “tube section” that doesn’t include the toe – you’d just have to tie a knot in one end to close it, then turn it inside-out to hide the knot.)
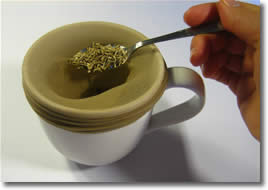 Step 2: Stretch the stocking over a large cup or mug, and spoon in about 2 teaspoons full of grass seeds.
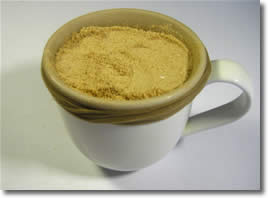 Step 3: Pack in some sawdust or potting soil. Aim for the head to be roughly tennis ball sized.
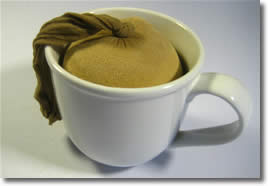 Step 4: Tie a knot to close the end. No need to cut off the dangly bit.
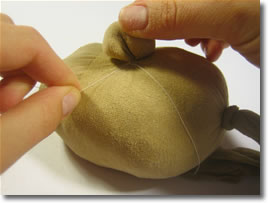 Step 5: You can make a bulbous nose or ears by grabbing a bit of stocking and twisting. Fasten base of the nose with some thread or a small rubber band.
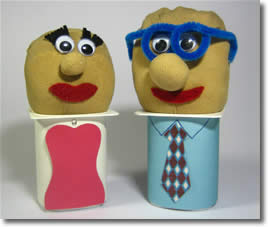 Step 6: Decorate! Use fabric scraps or permanent marker to decorate the face, and coloured paper to make the yoghurt container into a dress or a suit or whatever you like – get creative! Just make sure that any glues or markers you use for the head are water-proof.
Growing your Grass Heads
When you’re ready to grow your head, give it a good dunking in a bowl of water to moisten the sawdust/soil. Half-fill the yoghurt container with water, and put the head on top, with the excess stocking dangling down into the water.
Put your creation on a windowsill or somewhere with plenty of sunlight. Check every day to make sure the head is moist – you might need to dribble a few drops of water onto the head now and then.
“Hair” takes about 1 week to sprout . A full head of hair takes 3-4 weeks to grow, and and “greying and balding” will occur after about 6 weeks. Experiment with different hairstyles 🙂 You can make mohawks, pony-tails, crew-cuts… have fun with it!
Comments are closed.